Blot Placement Theory
Hello there, backgammon fans! In this blog post, we're going to look at blot placement theory, a key strategic concept in backgammon. This theory focuses on the critical decisions we face when determining where to position our blots, those single checkers that are at risk of being hit by our opponent.Take this position as an example: 
In the example above, Blue is currently leading in the race, and after rolling a 5 and a 3, it's evident that the mandatory move is to hit White's checker with a 3:
Now, we need to play a 5. The important question here is whether we should move our checker down to a safer position, safeguarding a valuable spare checker, but leaving another checker exposed within White's inner board:

Safeguarding the spare checker
Or, alternatively, should we prefer an escaping maneuver, aiming for freedom and reducing risk?
Escaping maneuver
In this specific roll, we can plan to achieve full freedom on our next move. The game-changing factor is White's stripped midpoint, a point without any spare checkers. This is where the blot placement theory comes into play. Placing a blot in front of your opponent's stripped point can be strategically advantageous. It forces your opponent, in this case, White, to roll an entering number before they can hit back. For example, if White rolls a 3 and a 4, they enter the checker, but they've lost control of their midpoint: 
This strategic positioning provides Blue with opportunities for counter hits with an ace or a three.Now, let's explore an alternative move in this position. If we decide to bring down both checkers, it results in a heavily loaded midpoint:
While we will still do the 5-3 hit, the previous play proves more effective. By consolidating our position, we avoid leaving blots in front of White's stripped points:
Safeguarding move
In short, we're sacrificing the immediate potential for freedom in exchange for a safer, more consolidated position. There's one more tip worth mentioning as to the blot placement theory: When you're compelled to leave a shot for your opponent, consider placing your blot on a point you'd prefer to make in the future.To illustrate this, suppose that White opens with a 6-1 and begins constructing their 7-point:
White opening with a 6-1

Then constructing their 7-point
When Blue rolls a 6-5, the optimal move is to play both numbers:
Option 1 for Blue
Alternatively, they could have moved all the way down to the 20-point, a move with fewer shots available for White to hit the blot: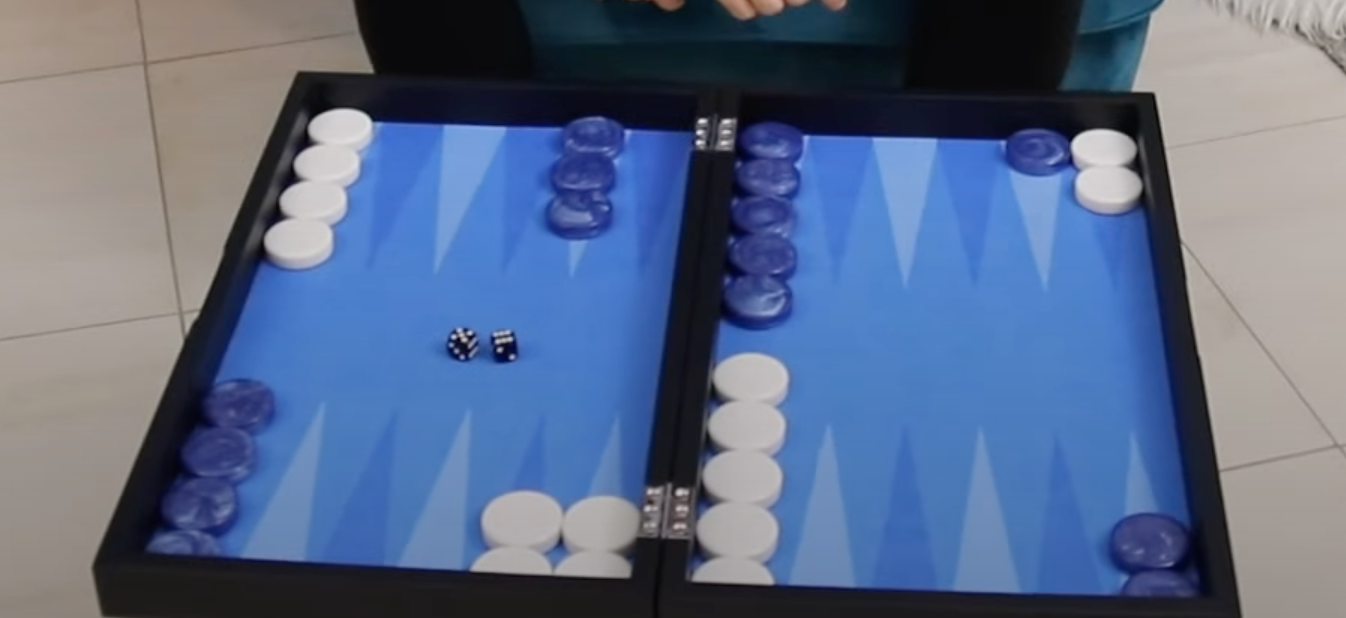
Option 2 for Blue
Among the two options, the latter would only be 11 shots out of 36, whereas the former would be 17 shots out of 36. The key here is that by positioning the checker on the 20-point, Blue is working towards establishing a point they desire to make in the future flow of the game.Also, take a moment to look at White's board. If White had a stronger position, like this example;
The danger of getting hit would be much greater. In such situations, you might choose a safer move, even if it means not making your preferred point right away: 
Choosing a safer move when White has a stronger position
But in the case we discussed initially, where White's board is not very developed, the right move is to bring your checker down to where it should be. So, that was all about blot placement theory for now. I hope you will benefit from this blog post in certain positions where you need strategies for positioning your blots in the most efficient way!You can see the full video here: https://www.youtube.com/watch?v=NR_Shy6JvC0